
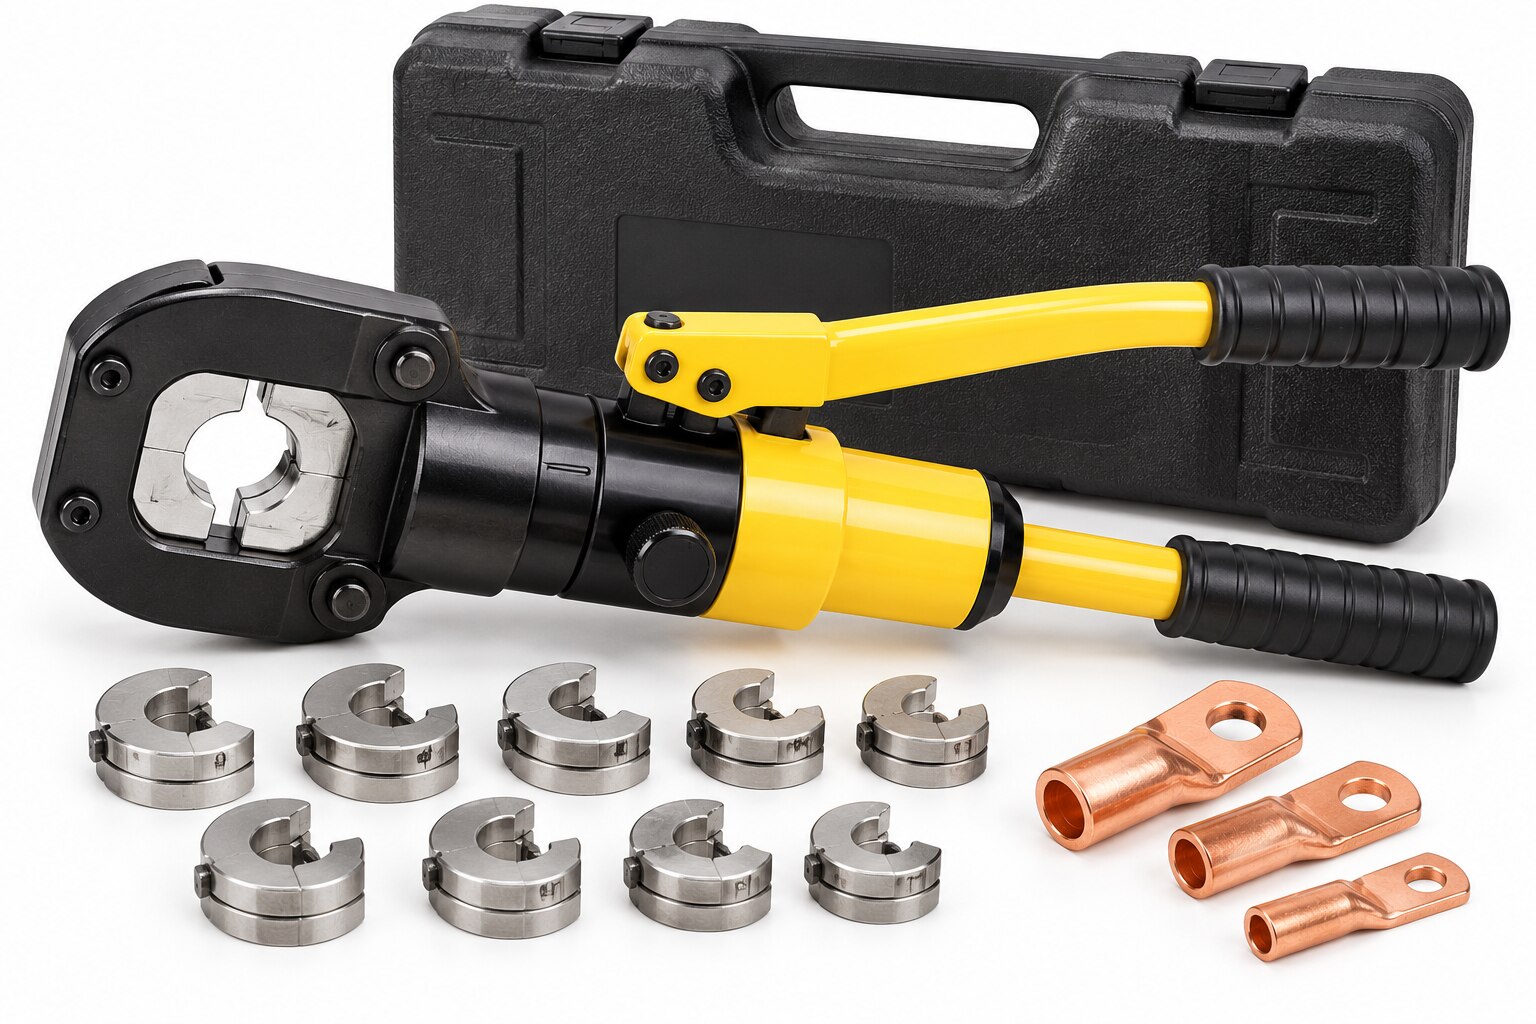
Large copper and aluminium conductors demand more than a visibly tight lug: the compression must be sufficient, repeatable, and matched to the terminal system. By the end, you will know how to operate a hydraulic crimper, select compatible dies and terminals, verify the finished connection, and decide whether a tool such as the YQK-300 or YQK-400 fits the work.
Key takeaways
- Complete the hydraulic cycle until the die reaches its specified final position.
- Match conductor size, terminal barrel, and die geometry before crimping.
- Inspect the finished crimp for full compression, cracks, voids, and correct alignment.
- Ask about compatible dies, force rating, maintenance, and safety features before buying.
Why hydraulic compression produces a more consistent heavy-duty crimp
A hydraulic crimping tool applies high die force through a controlled hydraulic cycle, making heavy-duty cable terminals less dependent on operator strength and timing.
| Tool | Limitation during heavy-duty crimping | Hydraulic advantage |
|---|---|---|
| Hand ratchet crimper | Handle force and jaw alignment become difficult as conductor size increases. | Hydraulic pressure supplies greater force with less operator effort. |
| Hammer crimper | Impact energy varies with the hammer blow, support surface, and striking angle. | The die closes progressively instead of relying on impact. |
| Manual lug crimper | Screw or lever pressure can vary between operators and stop short of full compression. | A pressure-release valve or automatic return helps complete the specified stroke. |
The result is more consistent barrel reduction and contact pressure, provided the terminal manufacturer’s die code and crimp profile match. A high tonnage rating alone proves little: die geometry, barrel design, tool stroke, and final die closure determine the actual connection.
Hydraulic pressure does not rescue poor preparation. Nicked strands, insulation inside the barrel, contamination, excessive strand flare, or a wrong strip length reduce conducting area and can leave a hot, mechanically weak joint.
Before crimping, match these four parts:
- Conductor class and material
- Terminal barrel design
- Die code and crimp profile
- Tool stroke and closed-die position
A hex crimp, deep-indent crimp, and nest-and-indent crimp are different results, not interchangeable appearances. The completed terminal still requires the specified inspection and acceptance checks; hydraulic compression improves repeatability, but it does not raise the cable’s ampacity or replace the connector manufacturer’s instructions.
The correct operating sequence from stripped cable to released die
A sound crimp begins with preparation, not pump force. Strip cable to the terminal manufacturer’s specified length, keeping every strand intact. Remove insulation, dirt, oxide and strand flare; strands left outside the barrel reduce the conducting area and create a weak joint.
- Confirm the conductor class and terminal part number before you select crimping die. Use the terminal manufacturer’s die code, not only the cable’s mm² or AWG marking. A die for a compacted conductor can under-compress a flexible conductor of the same nominal area.
- Insert the stripped conductor fully into the barrel. The strands must reach the barrel stop without protruding through the palm or entering the inspection window incorrectly.
- Position cable lug squarely between the dies, with the marked crimp zones aligned to the die marks. Keep the barrel supported; a tilted lug can create uneven reduction or damage its wall.
- Pump hydraulic handle until the dies close through the specified compression sequence. Complete every required indent or hex compression in the manufacturer’s stated order and spacing. Do not stop when pressure rises: a wrong die, obstructed stroke or oversized barrel can raise pressure before compression is complete.
- Hold the tool at full closure if the instructions require it, then operate the pressure-release valve or allow automatic return. Never pry the dies apart or move the lug under load.
- Inspect the finished mark pattern, position, barrel deformation and conductor retention. Reject a crimp with partial marks, cracks, loose strands or visible voids.
How to match conductor, terminal barrel, and die geometry
Choose the terminal and die as a matched set: conductor class, finished conductor diameter, barrel design, die code, and tool stroke must agree. Conductor area alone cannot establish that match.
| Conductor or terminal condition | What to verify | Why it matters |
|---|---|---|
| Class 2 stranded conductor | Use the terminal manufacturer’s specified barrel and die code | Strand packing affects barrel reduction and contact area |
| Compacted or sector-shaped conductor | Confirm the terminal accepts its finished shape and diameter | A wire-size label can leave the barrel under-compressed |
| Fine-stranded or flexible conductor | Check the approved terminal and compression profile | Excessive compression can cut strands or distort the barrel |
| Hexagonal terminal | Use the specified hexagonal crimp die and number of compressions | A different profile can leave voids or split the barrel |
| Deep-indent or nest-and-indent terminal | Use its dedicated die marks and positioning instructions | A hexagonal crimp is not an equivalent result |
Treat YQK-300 cable size and YQK-400 cable size labels as tool-identification clues, not proof that a particular lug and die fit. Obtain the terminal manufacturer’s die index; it takes precedence over a generic cable-size marking. Interchangeable dies that fit the tool body can still produce different reductions.
Before crimping, check these points:
- Match the terminal barrel marking to the conductor construction and cross-section.
- Install the die code specified for that terminal, not a visually similar insert.
- Position the barrel so every compression lands in the prescribed zone.
- Confirm the conductor reaches the inspection opening or required brush length, with no insulation inside the conductive barrel.
- Reject a crimp with the wrong mark pattern, split barrel, excessive swelling, or trapped strands.
Copper, aluminium, and the checks that prove the crimp is acceptable
Acceptance starts with the terminal manufacturer’s instructions: use the specified conductor class, strip length, die, crimp profile, compression sequence, and number of compressions. A hex crimp, deep-indent crimp, and nest-and-indent crimp are not interchangeable.
| Conductor | Preparation | Acceptance focus |
|---|---|---|
| Copper | Strip without nicking strands; clean the barrel and keep insulation outside the conductive section | Correct die marks, barrel shape, conductor position, and visible strand brush |
| Aluminium | Perform oxide removal, then apply the specified oxide-inhibiting compound before insertion and compression | Approved aluminium cable terminal, complete compound coverage, correct die system, and no contamination or reoxidation |
Aluminium oxide resists current flow, so delay between preparation and compression can increase contact resistance. Do not substitute a copper terminal, die, or compound for an aluminium-rated system.
Inspect every finished termination for these failures:
- Die marks match the manufacturer’s pattern and positions.
- The barrel has no split, crack, excessive swelling, or sharp distortion.
- Strands reach the specified inspection opening or brush length.
- No insulation is trapped inside the conductive barrel.
- The terminal is free from loose strands, contamination, and uncompressed voids.
IEC 61238-1 crimping qualification combines mechanical performance, electrical resistance, current cycling, and temperature or environmental effects. A pull test alone cannot prove acceptance: it can pass while incomplete strand compression or oxide contamination creates excessive resistance. Use pull testing and micro-ohm or resistance measurements for qualification, audits, or failure investigation, following the terminal manufacturer’s limits.
Tool condition, operator safety, and the specification questions to ask before buying
Before buying, prove that the crimper can complete the specified die closure for your exact conductor, terminal barrel, and crimp profile—not merely that it carries a higher tonnage rating. Ask how hydraulic pressure release and automatic return work, and confirm the operator cannot remove the tool under load.
1. Inspect the sample tool for leaking seals, contaminated oil, bent pins, cracked handles, damaged die faces, and a readable pressure gauge. Reject visible damage; hidden force loss can produce an unsafe, under-compressed joint.
2. Request the manufacturer’s maintenance schedule, hydraulic-fluid specification, seal and pin replacement procedure, storage instructions, and service contacts. Record serial numbers and maintenance history for repeated industrial use.
3. Confirm the crimper calibration procedure, acceptance tolerance, gauge traceability, and calibration interval specified by the manufacturer and your quality system. Do not assume annual calibration proves accuracy.
4. Verify lockout and isolation requirements before maintenance, die changes, or jam removal. The procedure must state how to stop the hydraulic source, release stored pressure, and prevent unexpected handle or ram movement.
5. Obtain a compatibility table covering conductor material and construction, terminal manufacturer, barrel dimensions, die codes, required stroke, closed-die position, and inspection marks. Compare the YQK-300 versus YQK-400 by those figures, not by tonnage alone.
Ask for operating and inspection documents that identify acceptable die marks, conductor protrusion, barrel swelling, and insulation clearance. Dollex Control Panel Accessories can supply the tool options, but you still need these written specifications before approving a production purchase. Pull or resistance tests validate a process; they do not replace correct tooling instructions.
Related products
 | HydraulicTools The YQK-400 Hydraulic Tool is a robust and versatile device designed for high-efficiency performance in demanding tasks. View product → |
 | HydraulicTools Hydraulic tools utilize pressurized fluid to generate powerful force for various applications. View product → |
Frequently asked questions
Why does hydraulic compression produce a more consistent heavy-duty crimp?
Hydraulic pressure delivers high, repeatable die force with less dependence on operator strength and timing than manual crimping.
What is the correct operating sequence for a hydraulic cable crimp?
Strip the conductor to the specified length, insert it fully into the terminal barrel, position the die correctly, complete the hydraulic cycle, and release the pressure before removing the crimped terminal.
How do you match a conductor, terminal barrel, and crimping die?
Confirm the conductor material and cross-sectional area, select a terminal barrel rated for that conductor, and use the die code or geometry specified for that terminal system.
How do you check whether a copper or aluminium crimp is acceptable?
Check the crimp location, indentation or hex profile, alignment, surface condition, and terminal deformation; reject crimps with cracks, loose strands, voids, or incomplete compression.
Related product
 | HartingConnectors Heavy Duty Connectors are robust, reliable components designed to withstand harsh environments and high-stress applications. View product → |